
 CrafteRafter is made up of three friends who want to do something that's different from their day jobs. Everyone bring different skills to the table - creativity, business sense, and sewing-fu. And everyone agrees that there are too many things in the world going to waste when it can be given a new lease of life. CrafteRafter combines saving the world with saving time and space in your life. And the cheerleader too, if we really have to. Each item is handcrafted and unique. This is how people typically describe things that are not spat off the end of a factory production line looking exactly like the last item and the next. Call it "character" or "wabi-sabi". Call it "handmade".
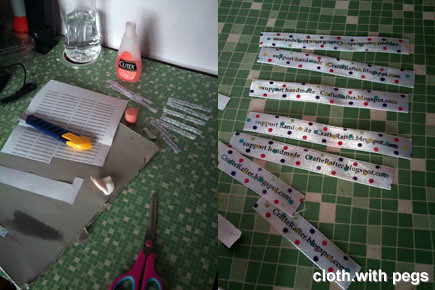 My task was simple ... make labels ... handmade labels.
The first batch of labels, were printed on polka dot ribbons. They were funky and I loved them 97%. That 3% was because, the transfer didn't quite stay on the 'dots'.
And since there had been a lot of questions about how these labels were made and requests for how-tos from friends, I am going to share this simple skill on this post. I have been doing this kind of transfers since college days, but I can't recall where I learnt it from.
Note that the mirrored photocopy for the transfer must be from a carbon photocopier (not laser copier). This will be stating the obvious, but in case you didn't know, it is mirrored so that when transfered, it will be 'correct'.
For this purpose, I cut them up in strips for transferring onto the ribbons.
 The medium for activating the transfer can be either turpentine, thinner or even nail polish remover. (btw, I clumsily slammed the car door on my right thumbnail last October) Facing the transfer downwards, I pressed the cotton pad previously soaked with thinner on the reverse side.
Tip: Do not drenched the cotton pad in thinner. Somehow, it works better when the cotton pad is lightly soaked. Test it out on spare fabric first.
 Hold the transfer paper firmly in place so that the transfered image/text is as sharp as it should be. Slowly remove the transfer paper after.
 When I completed printing onto the whole strip of ribbon, I cut them up into label sizes.
 Glue was applied at the end of the label strips to prevent fraying and left to dry.
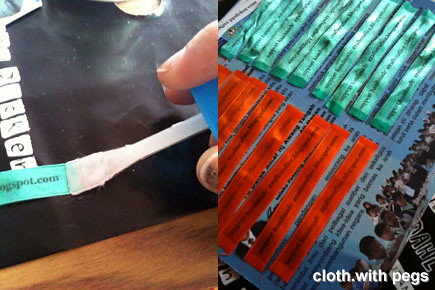 So, this was how our CrafteRafter labels were made. At this moment, there is only the 'Bagget'. Check it out!
By the way, this method works for other material surfaces too. Have fun testing it out!
2 comments:
Brilliant!! Thank you so much.. what a cool idea. who'da thunk? Nail polish remover??
Thank you.
wow.. great..!!!
Post a Comment