Friday, November 27, 2009

Pouch for iPhone

After salivating over the thought of getting a new phone, I finally got myself an iPhone. With all the extra fabric I have, I have made a new phone pouch. Use fabric from part of old t-shirt, some leftover jeans fabric, ribbon and a bit of pvc leather. Most of them were odds & ends that I saved from previous projects.

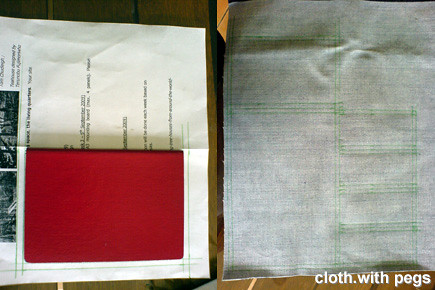
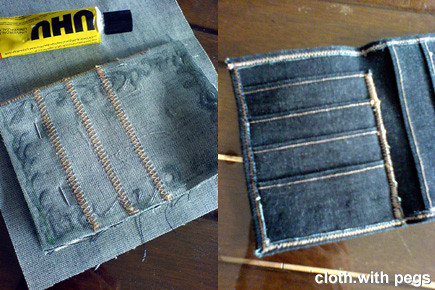
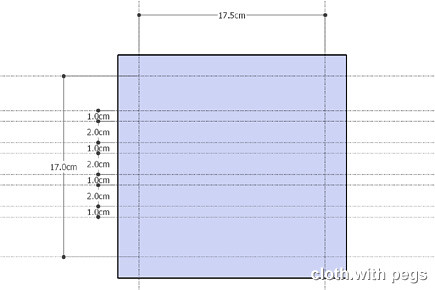
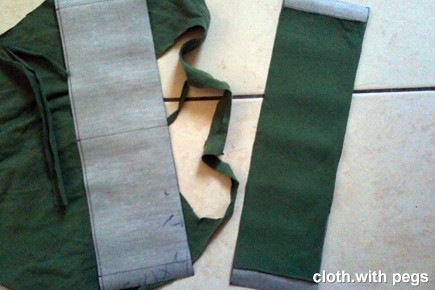
So, I started out with cutting out the outer fabric (jeans) with the template I prepared. (write me if u want the template with dimensions) Then I lightly glued it on the t-shirt material on the inside as lining, leaving about 1" at each end unlined, because I was going to fold it over and I don't need such a thick edge to hem.
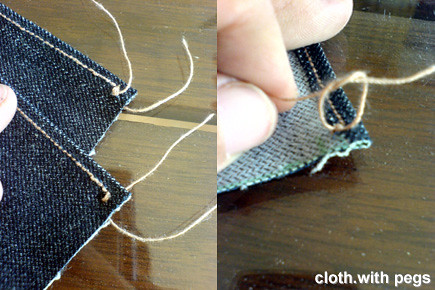
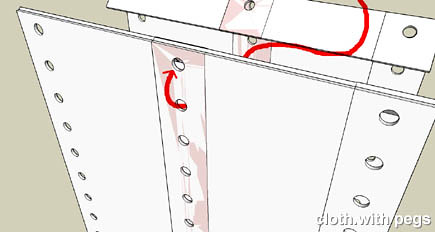
Before I head over to the sewing machine, I marked in opening I will need for the buttonhole, where I will slide the ribbon through. Now, this ribbon will help me pull/push the phone out of the pouch eventually. I offset the opening from the end of the fabric slightly over 2", in the middle and to the width of the ribbon.
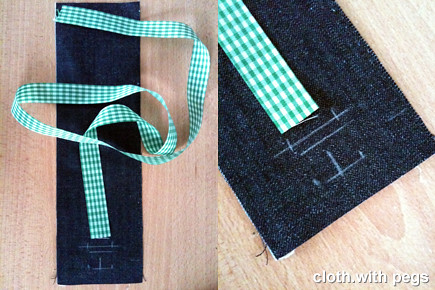
Now the sewing. I folded over one of the 1" ends, not lined with the t-shirt fabric, and sewed 2 straight stitch. And proceeded to making the buttonhole. 
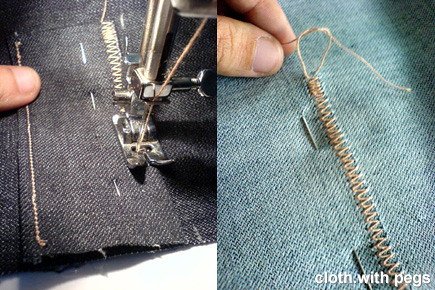
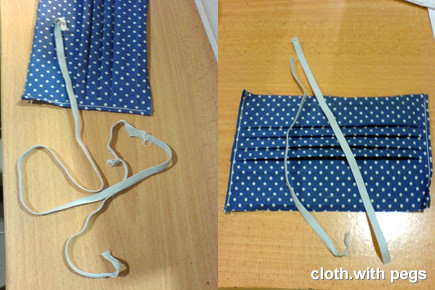
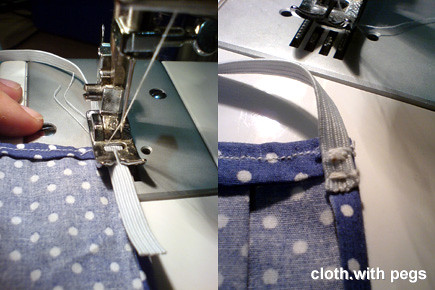
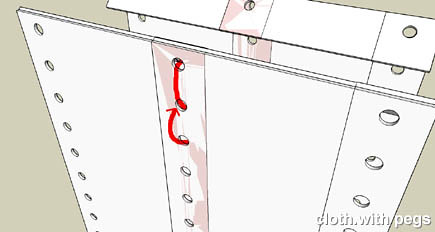
Stringing the ribbon through the buttonhole, I pulled it to the other end, which was not hemmed yet. Folded over the 1" end and sewed 2 straight stitches across with the ribbon inserted in the middle.
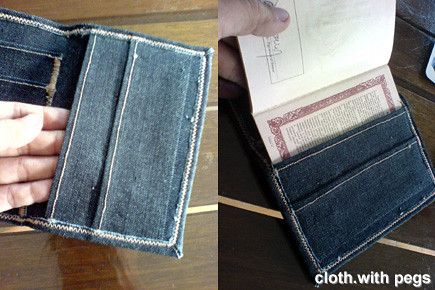
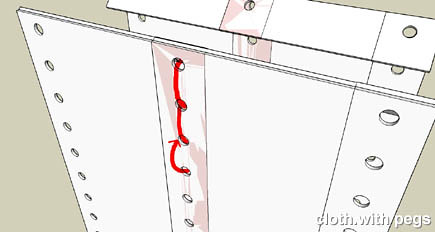
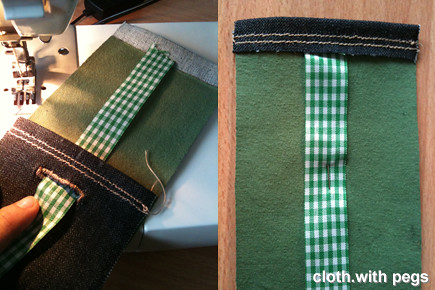
You may also noticed the pin that held the ribbon in place. I stretched the ribbon along the length of the fabric and pinned it down, all the way from the fixed end to the button hole. Then I halfed it with the insides (t-shirt lining) facing outwards, and sewed straight stitch down both sides.
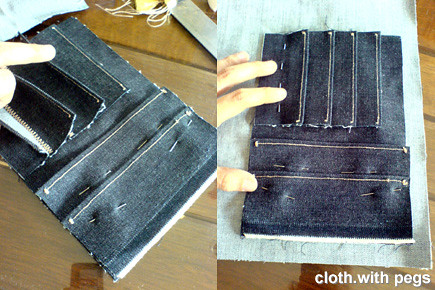
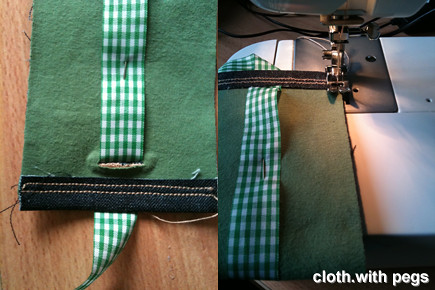
And flipped it inside out, revealing the jeans fabric. I usually use chopsticks to push out the corners.
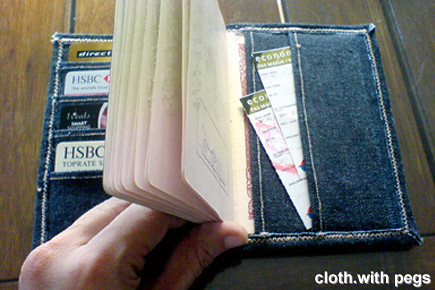
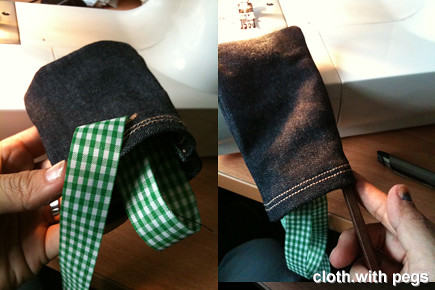
At this point, I sewed straight stitches along both sides, to secure it. I sometimes backstitch at the end of a straight stitch but I prefer sewing over one point using the function that stitches the ends of the buttonhole, because it's much neater. See the detail at below.
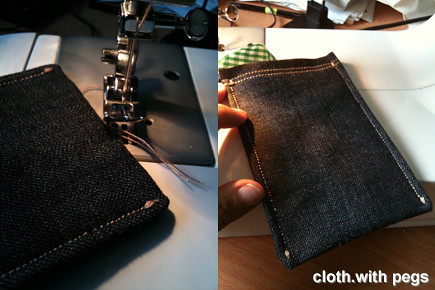
Since I didn't want the ribbon to stick out too much, I put the phone in all the way which pushed the ribbon all the way to the bottom, just to make sure. And cut off the access just at the rim of the opening. Then, I attached a halfed pvc leather at the end of the ribbon. This will be the finger pull part.
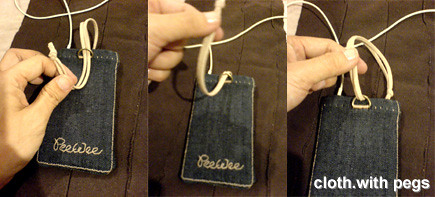
I trimmed off the access pvc leather after the adhesive had dried.
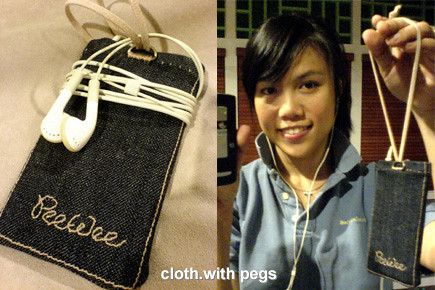
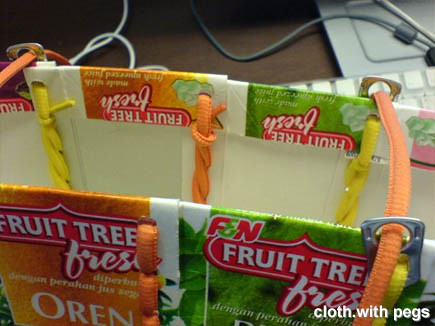
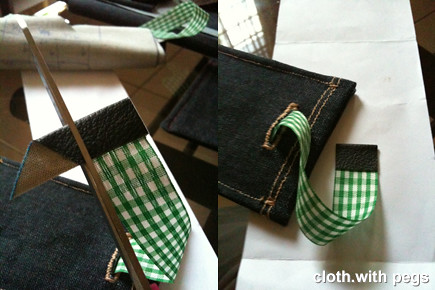
Finally, completed. Picture of phone pulled out of the pouch; and picture of ribbon when phone is tucked in.
I think this is a very simple pouch to make and can be applied to any phone, pda, etc. Simple satisfaction from own handmade goodness!

Tuesday, September 22, 2009

Going Away

Major development in my life. A lot moving-ons and going-aways. Finally, I will be able to do some travelling. All those blank pages will finally get to see some ink! And, I'm getting it dressed for success!!

I took out my passport and sketched out some basic patterns for a passport holder, which includes some card pockets and a slot for the back cover of the passport. (will share the pattern upon request) Traced it onto some jeans fabric, and cut.
Hemmed the top edges for the pockets.
At this point, I knotted the loose threads at the back, for all the pockets.I laid out the card pockets to be equally spaced and after I pinned it in place, I zig-zag stitched the bottom of the pockets, starting with the top pocket. Then, turning it over and knotted the loose thread at the back also. And, repeated the same for the remaining card pockets, top down.With the card pockets all sewn in place, I moved on to the slot for the back cover of the passport. I also added a shallower pocket for smaller items, like boarding passes (maybe). I pinned all the pieces in place, and laid it over the jeans fabric to mark out the holder's cover. I roughly cut it out with about 1 inch seam allowance on all sides.
Before attaching the cover, I zig-zag stitched the sides of the card pockets, which will kinda form the spine of the holder.
Ok, I cheated abit. I used glue. At least it held the edges of inner bit and the cover together ... for me to hem it all around, in zig-zag stitch. And, cut off the excess fabric. I usually add a bit of glue along the edges so it will not fray. (just be careful, it can get messy)The back cover slot was a snug fit!!! Perfect!!! (I take it as a good omen)
Ok, with all the cards & props.Now, who's ready for a over-due getaway? ME!!!

Sunday, August 16, 2009

The Sewing Republic

Another sewing community website that I found really useful and inspiring with all ranges of projects, from Fashion to Home Decor, is The Sewing Republic at http://sewingrepublic.com/

Here is a screen capture from their Sewing Help page, equipped with tips, FAQs and tutorials, so go on and check it out! Have fun!


Thursday, July 23, 2009

A Special Gift for A Special Friend

Recently I connected with someone who shared almost similar interest and childhood likes with me. It was amazing and almost unexpected to find someone like this halfway across the other side of the world. The most interesting thing is we share almost similar initials "PW".
And so I have decided to make something to commemorate this special friendship and a belated birthday ... the gift is on the way to the new owner ... from one PW to another PW.

Thursday, July 9, 2009

Current Issue : Face Mask with Bling

Made another face mask ... flashier ... ;P
I added a little bit of sequins on the fabric. Here's a close-up on the details ... check out the original post with full tutorial, here.

Tuesday, July 7, 2009

Current Issue : Face Mask

The lastest fashion accessory : The Face Mask. It's hitting the streets and jet-setters alike ...

It is definitely not fun in these times of H1N1, with confirmed cases hitting our shores in Sarawak. I have made some fancy mask cover to protect my surgical mask that had been distributed. Below is a set of very basic instruction if you want to make your own.

I took out a surgical mask for dimensions, to ensure it fits. I used some leftover fabrics that I have been saving.

These were my mask dimensions; 17.5cm x 17cm , with 2cm seam allowance. I also marked out the folds. Cut out the fabric as marked and continued marking the middle folds before ironing it down.Here, folds ironed in place, as marked. And a detail shot. Folds of 1cm (underside) and 2cm (overside).
I sewed a straight stitch along both sides to hold the folds in place, before hemming it inwards. Now, I took out a recycled rubber band (that I have been saving up too), measured the length according to the bands on the surgical mask and cut out 2 strips.I sewed it into the top seam allowance and the bottom seam allowance (on the same side). Cut of excess and repeat for the other side. After with, I hemmed the top seam allowance inwards to cover over the band, and repeat for the bottom seam allowance.Done. Placed it over my face (above the nose) and pulled the bottom bit downwards to achieve maximum coverage. It can be stretched all the way down to my neck. For extra precaution, wear the surgical mask underneath this mask.Honestly, its not only for your own protection, but it is also considered polite to wear this if you are having flu/cold. For more info about facemasks & respirators, read here.

Sunday, May 31, 2009

Beijing

Just wanna share some pictures from my recent trip to Beijing. One of the highlights from this trip was the National Theatre of China in Beijing, design by French architect Paul Andreu.

(oooo, those costumes and miniature set design models!!!)
some more photos here:

19th May 2009
arrived in Beijing Terminal 2
dimsum breakfast
Tiananmen Square
Beijing Opera House
Forbidden City
Pu Er Tea outlet
check-in to Taly Plaza Hotel
dinner

20th May 2009
BIAD
Planning Exhibition Hall
Peking Duck lunch
Opposite House (hotel) by Kengo Kuma
The Village (shopping centre)
(eat McD mapo pork burger!)

21st May 2009
Temple of Heaven
SOHO Jianwai
SOHO Shangdu
CCTV
Linked Hybrid
798
Tenggili Tala dinner

22nd May 2009
Summer Palace
Hotel 61 Cote Cour
Hotel Kapok
WangFuJing
Szechuan dinner
JiuBaJie (Bar Street)

23rd May 2009
Great Wall
Commune at the Great Wall
lunch near Olympic park
jade outlet
Qianmen Jianguo Hotel/Liyuan Theatre
Qianmen Jie

24th May 2009
rickshaw ride in Hutong
Water Cube (Olympic Aquatic Centre)
Bird's Nest (Olympic Stadium)
acrobatic performance
dinner
nite scene of Water Cube & Bird's Nest
(supper near hotel)

25th May 2009
and a couple of pics from our last day there at the airport

Friday, April 24, 2009

Juice-y Couture Handbag

With all this over-rated hype over fancy schmancy over-pricey Juicy Couture accessories, I'll show you my very own ... JUICE-Y Couture Handbag Spring/Summer 2008!This is a crafting project I did back in March 2008. And since then there were requests for tutorials but I have not gotten around making another one, so I am going to illustrate and explain.

In my case, I used 4 identically sized carton boxes. For a wider bag, you can opt for 5 or more, and for a narrower bag, you can use 3 or even 2 cartons. Open up the seal at the top carefully by hand and remove the plastic cap (if any).Prepare 3 Types, as illustrated:
Type 1 : End - 3 sided with 1" flap and punched holes along one side;
Type 2 : Intermediate - 2 sided with 1" flap and punched holes along both; and
Type 3 : End - 3 sided, no extra flaps and only punched holes along one side.

Cut of the the top part, leaving about 1" from the crease line. At the side flaps, measure and mark a stretch of approximately 20mm spaced points. At the marked points, use the hole puncher and make a hole.(Tips: For evenly spaced openings and uniformity, use a separate cardboard strip and punch the holes evenly along it. Then overlay the strip on all the flaps and traced the holes onto it with marker.)

Fold the top flaps inwards.Here, we'll 'stitch' it all together. Using backstitch, I stringed up the carton boxes with 1 pair of orange and 1 pair of yellow shoelaces to string. You can choose your own color to match the graphics on the carton boxes. Start from the 2nd hole from the top.

1 ...2 ...3 ...As for the rings for the strap, they were a total of 4 aluminum can tabs. Close-up like so ...Here's another look!

Wednesday, April 8, 2009

Mysterious

Borneo Boy asked me to make him a mask for our PAMSC BTS Gala Dinner.

What are the chances one would get to pressed aluminum foil up on the face of the president of an architect's association at a charity auction dinner with lots of who's-who?

Sure! Why not ...

At the Habitat for Humanity charity dinner, I traced and contoured the profile of CW's face with an aluminum foil & marker pen that I brought from home. Forgot to get someone to take a photo of me doing it in the middle of the dinner. But this is the photo of the aluminum foil (after) on the the dining table; and after I applied on the strips of masking tape.To hold CW's mask in place, I tied in the transparent rubber band I used for beading, on both sides of the mask. And here's the both of us. CW sprayed finished the mask with white and added the tear himself after I handed him the mask. That's some DIY effort there!Now, either my nose is not in the middle of my face, or the mask is not centered.

Tuesday, March 3, 2009

Masq-uerade

[Fear not! This has nothing to do with preventing aliens from reading my mind. Although the first picture may remind you of a scene from "The Signs"]

Recently, I saw that a dinner I’ll be attending is themed as “Mysterious”, and so, I made myself a masquerade mask. I have always been fascinated with masquerade masks, but they tend to get quite pricey and also, not so available locally.

Like always, I put together a couple of crafting tutorials and improvised them for making this mask. For moulding the shape of the mask, I used 3 layers of aluminium foil (those you use in the kitchen) and pressed it up against my face. Making sure I get those brows, eye sockets, nose & cheekbones.Then, I cut into the eye sockets in flaps and folded it to the back. I tried to check in the mirror once in a while until I get the desired eye opening, for one eye first.Close-up of the opening.
To get the (close to) exact opening size, I traced the first opening, cut it out, flipped it over (mirrored) to the other side and traced it into place. And, repeat the previous process for the eye opening.
After that, looking through both openings, I sketched the outline of the mask, by pressing it up against my face and in front of the mirror. Then, I folded the extra aluminium foil along the edges, to the back. This should also make the mask have a stronger and more defined edge.
I continued to mould it for a more 3D effect. Here’s the front & the back of it.
I chose to add another base to the aluminium foil, by wrapping it up in strips of masking tape. This also holds those loose aluminium flaps in place before applying the paper mache, using toilet paper & craft glue.
Application of craft glue and layers of toilet paper strips later, I finished it off with a final coat of water with diluted craft glue, and left it to dry.
Add ImageOn the dried mask, I glue on a layer of black tulle (salvaged from other sewing projects). I chose to not cut openings at the eyes, since there was visibility through the tulle. Since most of the garnish I chose was already in black, I also did not paint the paper mache finish, so I could get a bit of contrast with the tulle lined on it. Then I garnished it further with black sequins, black feathers, black lace trims and an elaborate ‘diamond’ button.
... and voila!

At this moment, the mask kind of grabs my face at the forehead and the sides. I may add ribbons to tie it to the back of my head, or a stick to the side at a later stage.