I have a confession, some of my closest friends have heard this before ... I always had 2 fears about using the sewing machine, which prevented me from going near a sewing machine. As morbid and as silly as it may sound, I was afraid that:
1) my finger will get caught under the presser foot and the sewing machine will eat me alive (at least my hand); and
2) the needle will break and the sharp pointy bit will fly into my eye (that reminds me; I need to get myself an industrial safety glasses).
After all these years of gluing fabric together, I finally taught myself to use a sewing machine!!! So I guess my creative urges were stronger than my fear.
In 2008, I made lotsa stuff with the sewing machine (and sometimes still gluing stuff together) and started this crafting blog! HURRAH!!! Looking forward to more projects in 2009!
HAPPY NEW YEAR EVERYONE!!!
Wednesday, December 31, 2008
Tuesday, December 30, 2008
"Croquis is Not a French Pastry"
Croquis, although sounds like a pastry, it simply means 'sketch' in French. It is pronounced as \krō-ˈkē\ which is a noun of croquer, meaning to sketch. (From Merriam-Webster)
In fashion, it refers to a quick sketch of 'mannequin' modelling clothes that are being designed, and are usually not of realistic human proportions.
 Here's a useful link for croquis (as shared by ladyjanewriter of Threadbanger Forum), http://www.designersnexus.com/tag/croqui/
In fashion, it refers to a quick sketch of 'mannequin' modelling clothes that are being designed, and are usually not of realistic human proportions.
 Here's a useful link for croquis (as shared by ladyjanewriter of Threadbanger Forum), http://www.designersnexus.com/tag/croqui/
Grecian-Inspired Hairbands
I browsed a hair accessories shop recently and I was shocked out of my skin, when I found out how expensive some of these hairbands were. Evita Peroni is selling the leather ones at RM115-RM156 each, while the cheaper ones were selling them at RM35-RM50 each!
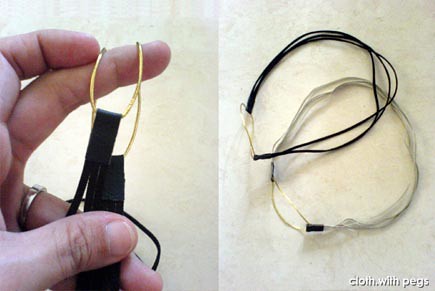
Being a known cheapskate, I am determined to make my own. I bought leather straps of 3 different colors and 1 silver ribbon at 2m length each, all for less than RM20. And I made myself a total of 5 hairbands!
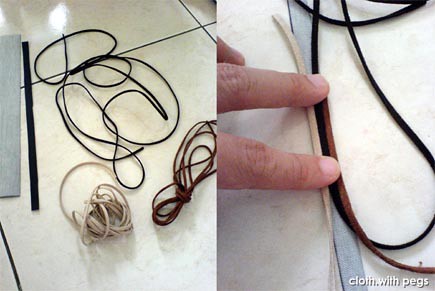
And this is how I did it. After I measured my head, from front-top to back-bottom and back up again, I figured I need about 52cm in 'circumference'. So, I cut up the straps and ribbon in 42cm each, leaving the extra 10cm for the rubber band. I sorted them out into 5 groups of 3 pieces each. 1) 3nos of dark brown leathers; 2) 3nos of reddish brown leathers; 3) 3nos of beige leathers; 4) 1no of dark brown, 1no of reddish brown and 1no of beige; and 5) 3nos of silver ribbons. (Other alternatives, would be 4 straps or 5 straps)
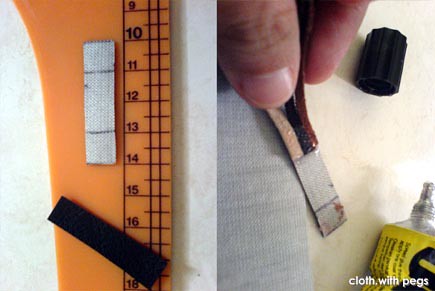
 Then, I cut up the fake leather scraps from a furniture refurbishing store (from my Mecha-monocle project) into a strip, as wide as the 3 straps put together. After that, I divided the strip into 10nos of 4cm lengths (2 end pieces of each hairband), and made a marker of 1cm on each end. And glue.
 After looping the leather bits back to be glued on the other side of the ends, I made sure I leave a allowance for the rubber band to be threaded later. (If you decided to use a rubber band for hair that is already in a loop, you should insert it in at this point, before sealing it up.)
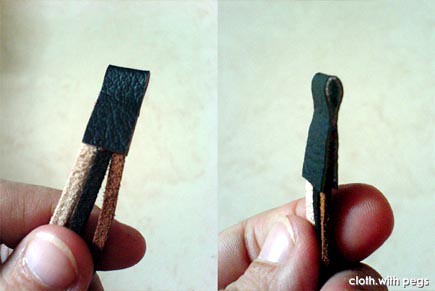 Repeat it for the other end, while ensuring that the straps are all in line and facing the same way up. After the glue at both leather ends are securely dried, insert the rubber band. In my case, I cut up 20cm, which is double the remaining length of what I need to complete the loop.
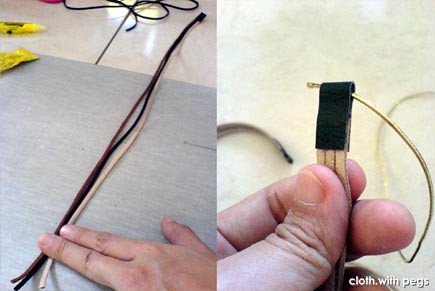 This is so that it will not be too tight and end up shrinking & sliding to the back of your head, by the end of the day; while still having a little tension because it is including the knot you will be tying and the width of the leather ends. Meaning to say, it will be only slightly less than 10cm after it all.
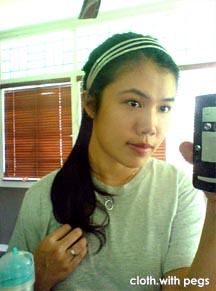
 Since my hair is naturally straight and with some leftover curls at the end from my perm 2 years ago, it looks really neat & tidy here. Or else you can try a poofy wild variation, like how they dressed Blake Lively's hair in Gossip Girl, during the white party.
Being a known cheapskate, I am determined to make my own. I bought leather straps of 3 different colors and 1 silver ribbon at 2m length each, all for less than RM20. And I made myself a total of 5 hairbands!
And this is how I did it. After I measured my head, from front-top to back-bottom and back up again, I figured I need about 52cm in 'circumference'. So, I cut up the straps and ribbon in 42cm each, leaving the extra 10cm for the rubber band. I sorted them out into 5 groups of 3 pieces each. 1) 3nos of dark brown leathers; 2) 3nos of reddish brown leathers; 3) 3nos of beige leathers; 4) 1no of dark brown, 1no of reddish brown and 1no of beige; and 5) 3nos of silver ribbons. (Other alternatives, would be 4 straps or 5 straps)
 Then, I cut up the fake leather scraps from a furniture refurbishing store (from my Mecha-monocle project) into a strip, as wide as the 3 straps put together. After that, I divided the strip into 10nos of 4cm lengths (2 end pieces of each hairband), and made a marker of 1cm on each end. And glue.
 After looping the leather bits back to be glued on the other side of the ends, I made sure I leave a allowance for the rubber band to be threaded later. (If you decided to use a rubber band for hair that is already in a loop, you should insert it in at this point, before sealing it up.)
 Repeat it for the other end, while ensuring that the straps are all in line and facing the same way up. After the glue at both leather ends are securely dried, insert the rubber band. In my case, I cut up 20cm, which is double the remaining length of what I need to complete the loop.
 This is so that it will not be too tight and end up shrinking & sliding to the back of your head, by the end of the day; while still having a little tension because it is including the knot you will be tying and the width of the leather ends. Meaning to say, it will be only slightly less than 10cm after it all.
 Since my hair is naturally straight and with some leftover curls at the end from my perm 2 years ago, it looks really neat & tidy here. Or else you can try a poofy wild variation, like how they dressed Blake Lively's hair in Gossip Girl, during the white party.
Sunday, December 28, 2008
Shiny Cute Xmas Tree
With a combination of can tabs from Heineken cans (green), Tiger can (gold) and regular soft drink cans (silver), I made a shiny cute xmas tree, of good-ole recycled goodness!!!
Armed with a metallic green flower arrangement wire and a pair of wire cutter, I'm on the way.
I started with the bottom ring of 12 green tabs. Then, the one on top, with 11 tabs. Gradually, 10 tabs, 9 tabs, until it got to the top, with 6 tabs. I secured those rings together with wires at 3 points per layer, cut to 1 inch each.
 Every (well, most) Xmas tree needs a feature on top. So I made a gold 'star' of 6 tabs (5 gold & 1 green) as shown in the picture.
I only created 2 rows of silver as accents to the trees, which I preferred it to be predominantly green!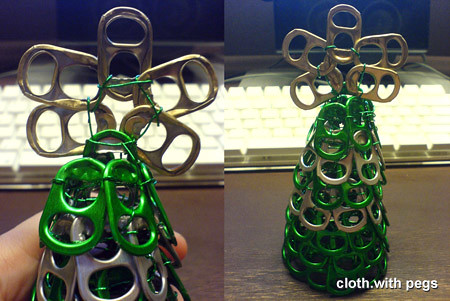 I used a total of 48 green tabs, 16 silver tabs and 5 gold tabs. Now, all you have to do is drink up (or collect) at least almost 3 cartons of beer and soft drinks and you can have yourself a metallic tiny Xmas tree too!!!
MERRY CHRISTMAS!!! and A HAPPY NEW YEAR 2009!!!
Armed with a metallic green flower arrangement wire and a pair of wire cutter, I'm on the way.
I started with the bottom ring of 12 green tabs. Then, the one on top, with 11 tabs. Gradually, 10 tabs, 9 tabs, until it got to the top, with 6 tabs. I secured those rings together with wires at 3 points per layer, cut to 1 inch each.
 Every (well, most) Xmas tree needs a feature on top. So I made a gold 'star' of 6 tabs (5 gold & 1 green) as shown in the picture.
I only created 2 rows of silver as accents to the trees, which I preferred it to be predominantly green!
 I used a total of 48 green tabs, 16 silver tabs and 5 gold tabs. Now, all you have to do is drink up (or collect) at least almost 3 cartons of beer and soft drinks and you can have yourself a metallic tiny Xmas tree too!!!
MERRY CHRISTMAS!!! and A HAPPY NEW YEAR 2009!!!
Wednesday, December 24, 2008
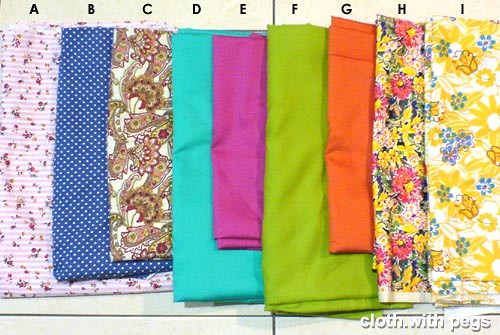
Fabrics Galore : Dec 2008
Friday, December 19, 2008
Fabric : Rayon
 Rayon, from cellulose, has many of the qualities of cotton, a natural cellulose fiber. Rayon is strong, extremely absorbent, comes in a variety of qualities and weights, and can be made to resemble natural fabrics. Rayon does not melt but burns at high temperatures.
Rayon drapes well, has a soft, silky hand, and has a smooth, napped, or bulky surface. Rayon will wrinkle easily and may stretch when wet and shrink when washed.
Washable rayon will state the care on the fabric label. Like silk, if you pre-wash rayon fabric prior to construction of the garment, you have a washable garment.
[From Fabrics.net]
Also read Japan Chemical Fibres Association - Rayon
Thursday, December 18, 2008
Miniature Dinner Gown
ZuAn is a 12-year-old crafty little girl. Crafty meaning she knits, she makes bears, she knits bears, she makes dolls, she makes dresses for her dolls and bears, she sews and she draws extremely well too.
The creative genes are most likely courtesy of her parents as artists. Her mom told me that she encourages ZuAn to keep all her sketches in a sketch book instead of loose pieces of paper. That sketch book was exhibited during her mom's solo art exhibition in Singapore, and there was a lot of demand for that sketch book. It was about an on-going amazing adventure of a little girl with Superpig and friends, and its all from fragments of her imagination. I'm truly inspired by her.
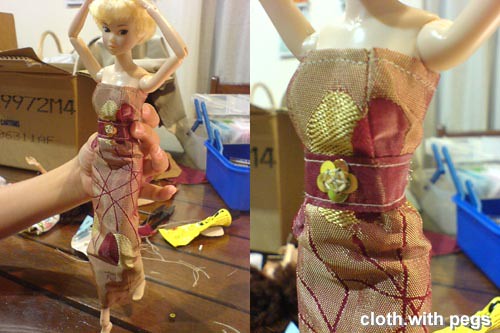
 Recently she visited us with her horde of a family. While the other kids are playing computer games, she was knitting or sketching away. She jokingly said that she'd rather stick to handicraft because she is 'technologically challenged'. So I accompanied her in making some dresses for both of her Momoko dolls. She collected my mother-in-laws fabric scraps, and one of it was a very nice magenta colored curtain fabric with gold weaves. So we decided to make a simple tube dress, which I worked on from inside out. I darted it to give it contours too.
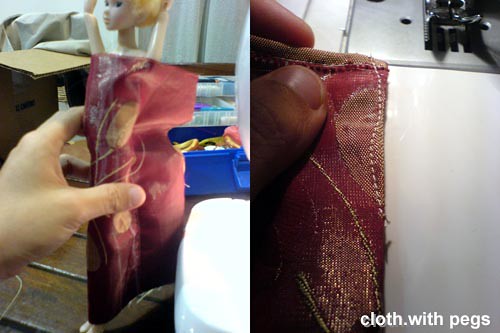 At the back, while ensuring that Momoko can slip in and out of the dress, we decided to give her a velcro fixing. After all that, we decided that the dress still didn't give her enough of a waistline, so I made Momoko an obi, also fastened with velcro at the back.
  I secured the obi to the dress with sequins, shaping it like a sakura.
 Here's Momoko modelling her new dress at my sewing machine, and with some of my Re-ment collection.
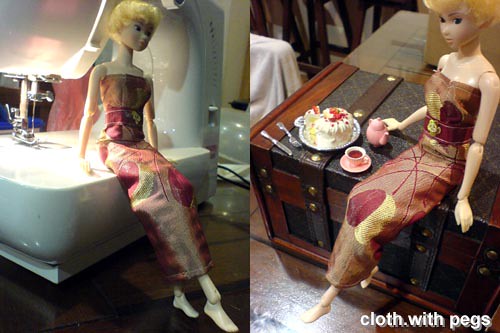 I later added a 'gold' necklace and hairband to Momoko from my beading wires.
This is a not my first miniature, but definitely a miniature first with my sewing machine. It made my already stubby fingers feel like big clumsy sausages.
The creative genes are most likely courtesy of her parents as artists. Her mom told me that she encourages ZuAn to keep all her sketches in a sketch book instead of loose pieces of paper. That sketch book was exhibited during her mom's solo art exhibition in Singapore, and there was a lot of demand for that sketch book. It was about an on-going amazing adventure of a little girl with Superpig and friends, and its all from fragments of her imagination. I'm truly inspired by her.
 Recently she visited us with her horde of a family. While the other kids are playing computer games, she was knitting or sketching away. She jokingly said that she'd rather stick to handicraft because she is 'technologically challenged'. So I accompanied her in making some dresses for both of her Momoko dolls. She collected my mother-in-laws fabric scraps, and one of it was a very nice magenta colored curtain fabric with gold weaves. So we decided to make a simple tube dress, which I worked on from inside out. I darted it to give it contours too.
 At the back, while ensuring that Momoko can slip in and out of the dress, we decided to give her a velcro fixing. After all that, we decided that the dress still didn't give her enough of a waistline, so I made Momoko an obi, also fastened with velcro at the back.
  I secured the obi to the dress with sequins, shaping it like a sakura.
 Here's Momoko modelling her new dress at my sewing machine, and with some of my Re-ment collection.
 I later added a 'gold' necklace and hairband to Momoko from my beading wires.
This is a not my first miniature, but definitely a miniature first with my sewing machine. It made my already stubby fingers feel like big clumsy sausages.
Wednesday, November 26, 2008
Capt Cyke : Badge of Office
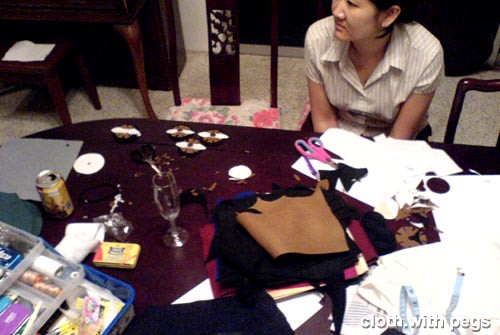
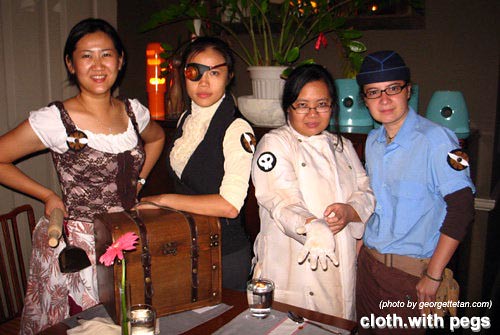 As the crew of an airship, Georgette made us Badge of Office! This post is a tribute to the badges she (and some of us) made, since she hadn't posted anything about it. Below is G adding the final touches at my place.
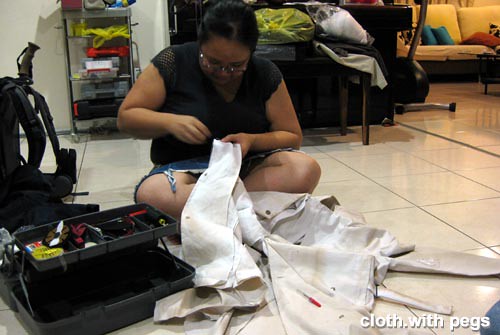 Some of them were done at Maggie's, with Aline.
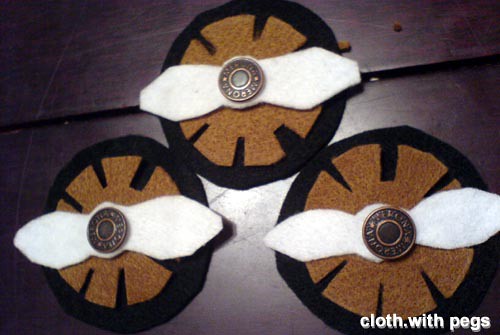
 Badges of The Argos.
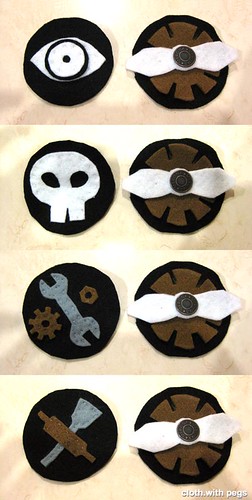
 top-bottom: The Captain, The Doctor, The Machinist & The Cook
 I thought they were absolutely amazing, so I decided to wear it to work today! and when asked, I just said "My friend made it for me" :)
Monday, November 3, 2008
Capt Cyke : Entourage on board The Argos
 top (l-r) : Crew of The Argos -
Lucky Liz ; Capt Cyke ; Dr C J Morta ; Aline Cook
middle (l-r) : Cartographers -
Sir Mylo Worthington ; Ms Julia Phillips
bottom (l-r) : Mercenaries -
Kelvinus 'Blue' Pfizer ; The General ; Ual Nala The Mysterious
(I made up some of the names as I go along ... :P)
other links:
Georgette Tan
Friday, October 31, 2008
Capt Cyke : Mecha Monocle
Happy Halloween!!!
As Capt Cyke has only one good eye, the other eye need to be mechanically enhance for better vision and focus.
I looked around the house for something I could modify into a monocle. And, I understand why they say the best inspiration comes from 'toilet' time.
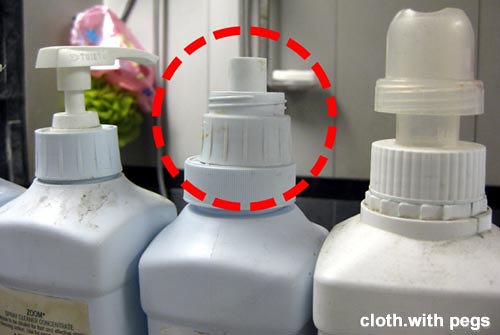 I sprayed the plastic detergent nozzle with copper spray paint.
About fastening it, I went to the hardware store and got this copper looking metal 'band' thing, where you can screw it to tighten and to loosen.
I made up my own eye patch pattern to suit the size of my monocle base. Roughly sketched it up on a paper and traced it unto the reverse side of some fake leather scraps from a furniture refurbishing store.
Below, a picture of a couple of the basic materials I used to spruce up the mecha monocle.
I cut a smaller round hole in the eye patch and then cut flaps towards the outer ring. I slotted the eye patch through the plastic nozzle and fitted the metal band in. Here you can see the copper color is shaded and toned down by a gold colored marker, to give it some rustic look.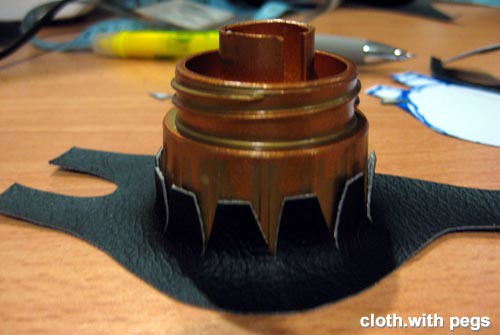 I attached the D-rings to the other 3 flaps on the eye patch and tied some ribbon to hold it around my head. For 2 of those flaps, I used metal hooks as clip-ons from the ribbon.
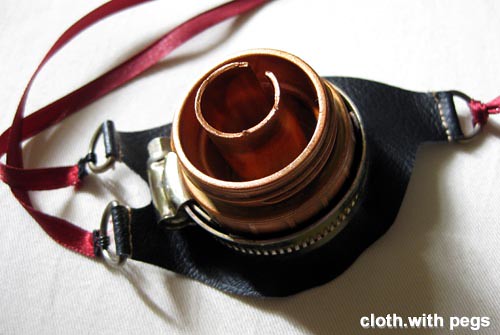 The Mecha-monocle!!!
 Capt. Cyke in civilian clothing and her 'EYE'!!!
As Capt Cyke has only one good eye, the other eye need to be mechanically enhance for better vision and focus.
I looked around the house for something I could modify into a monocle. And, I understand why they say the best inspiration comes from 'toilet' time.
 I sprayed the plastic detergent nozzle with copper spray paint.
About fastening it, I went to the hardware store and got this copper looking metal 'band' thing, where you can screw it to tighten and to loosen.
I made up my own eye patch pattern to suit the size of my monocle base. Roughly sketched it up on a paper and traced it unto the reverse side of some fake leather scraps from a furniture refurbishing store.
Below, a picture of a couple of the basic materials I used to spruce up the mecha monocle.

I cut a smaller round hole in the eye patch and then cut flaps towards the outer ring. I slotted the eye patch through the plastic nozzle and fitted the metal band in. Here you can see the copper color is shaded and toned down by a gold colored marker, to give it some rustic look.
 I attached the D-rings to the other 3 flaps on the eye patch and tied some ribbon to hold it around my head. For 2 of those flaps, I used metal hooks as clip-ons from the ribbon.
 The Mecha-monocle!!!
 Capt. Cyke in civilian clothing and her 'EYE'!!!
Thursday, October 30, 2008
I'm Back!!!
Monday, September 22, 2008
A Different Kind of Fabric
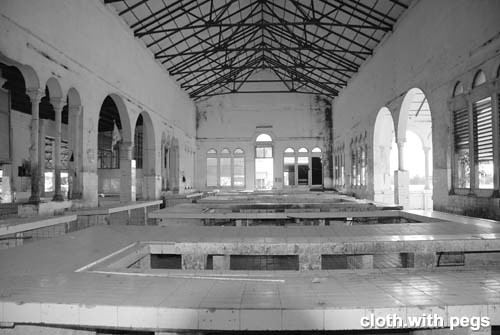
Recently I have been involve in a different type of Weekend Project, not of cloth, but of a different kind of fabric. This is the first time I write about something other that my craft hobby. This is related more to my mainstream work, which I do take passion in that I decide to share it.
 In hopes of preserving the existing fabric, we did measured drawings and documentation of the existing structures along the Old Markets along Gambier Street. Education and Awareness (plus nostalgic sentiments, we hope) will save these remnants of Old Kuching waterfront. At least, I will be able to tell our next generation of what our heritage was, through our documentations.
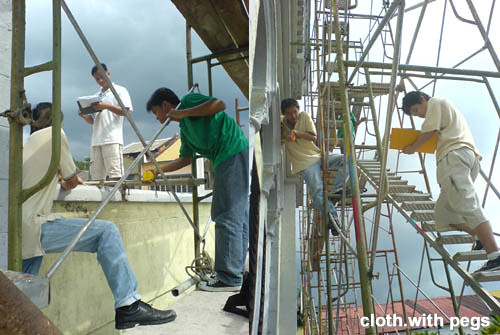 I actually found myself enjoying the talks and walks, I gave to young people; getting them to identify old buildings and monuments. Telling them about the hey-days and those handed-down stories. I realised that kids this generation knows nothing about old Kuching buildings. So, if we don't start being conscious about our culture and heritage, soon, our history and heritage will be just stuffs of myths and legends.
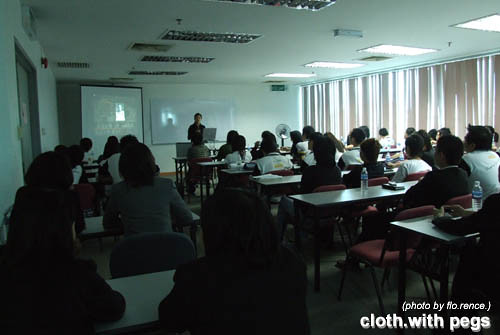 Now, a walk down memory lane and the current state.
The Old Fish Market & Vegetable Market at Gambier Street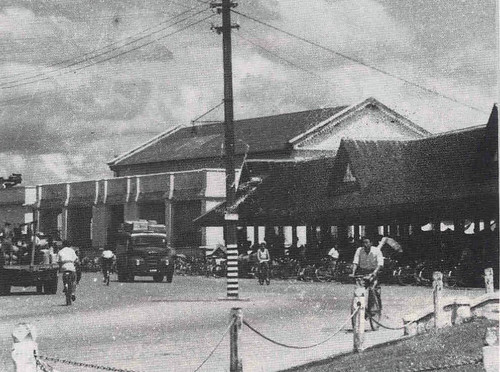
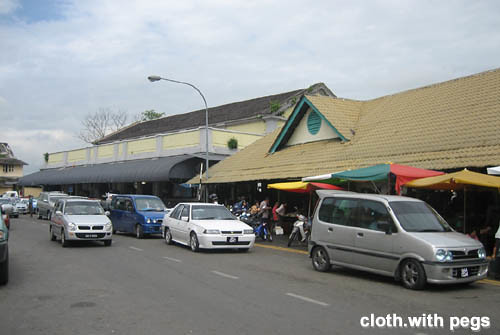
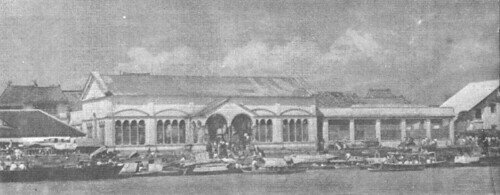 Interior of The Old Fish Market (before, full of life)
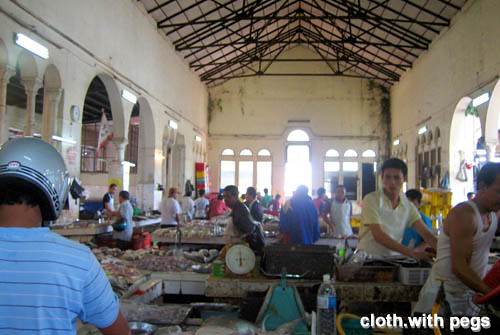 Interior of The Old Fish Market (abandoned and left to rot)
 Interior of The Vegetable Markets (before, full of life)
 Interior of The Vegetable Markets (abandoned and left to rot)
 In hopes of preserving the existing fabric, we did measured drawings and documentation of the existing structures along the Old Markets along Gambier Street. Education and Awareness (plus nostalgic sentiments, we hope) will save these remnants of Old Kuching waterfront. At least, I will be able to tell our next generation of what our heritage was, through our documentations.
 I actually found myself enjoying the talks and walks, I gave to young people; getting them to identify old buildings and monuments. Telling them about the hey-days and those handed-down stories. I realised that kids this generation knows nothing about old Kuching buildings. So, if we don't start being conscious about our culture and heritage, soon, our history and heritage will be just stuffs of myths and legends.
 Now, a walk down memory lane and the current state.
The Old Fish Market & Vegetable Market at Gambier Street


 Interior of The Old Fish Market (before, full of life)
 Interior of The Old Fish Market (abandoned and left to rot)
 Interior of The Vegetable Markets (before, full of life)
 Interior of The Vegetable Markets (abandoned and left to rot)
Friday, September 19, 2008
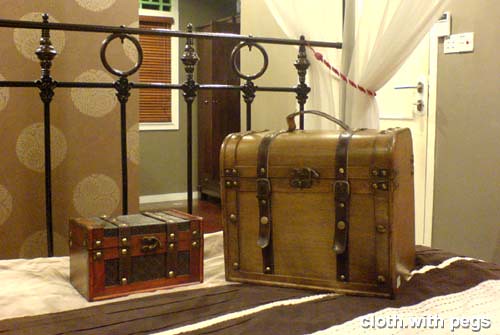
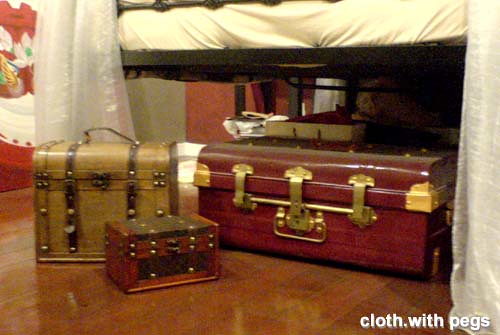
Treasure Chest
Thursday, September 11, 2008
Wrap Pants
My most comfortable pair of pants ... is getting really old & shabby. I will continue wearing it until it rips apart. Meanwhile, I have made another one based on my own pair, with a few modification to the pattern, for economic use of fabric.
My parents told me before that my grandfather who came from China, wore this kind of wrap pants a lot. I know why.
I recorded all the measurements taken off the existing pair of pants. Before planning to cut on it.
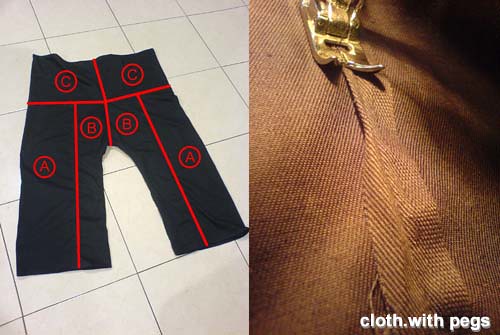
2 nos of A ; 4 pieces of B ; 2 pieces of C (I hope the scan is clear enough to see the dimensions)
 Joining 2 Bs together as shown below along the red line, twice; one for the front and one more for the back. Then I attached A to BB (ref pic); As are the side panels. Folding the As half, I attached the last piece of BB.
 Then, I attached the waist piece (C). I kept the joints for CC, aligned with the joints for BB. Finally, I tucked and hemmed all the exposed edges.
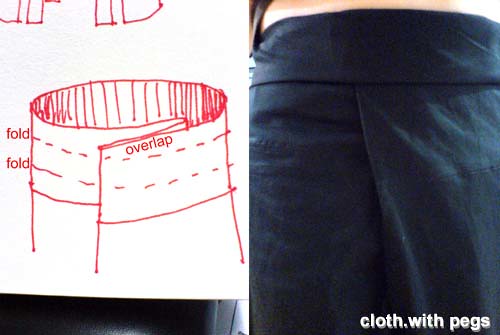
 To wear the pants (since the waistline is bigger), I'll have to overlap it in front, and fold down twice, to secure it in place. You can try variations of how to wear them, but this is the method I am very used to and it is really quick.
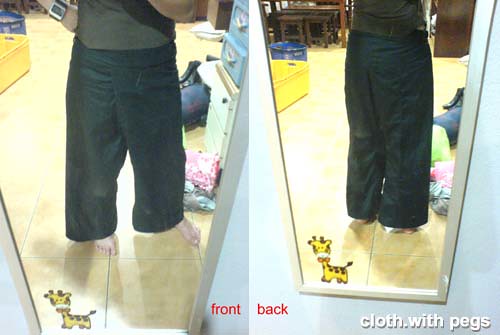
 Here, I am seen parading in front of the mirror again. I have worn it to the office too!
My parents told me before that my grandfather who came from China, wore this kind of wrap pants a lot. I know why.
I recorded all the measurements taken off the existing pair of pants. Before planning to cut on it.
2 nos of A ; 4 pieces of B ; 2 pieces of C (I hope the scan is clear enough to see the dimensions)
 Joining 2 Bs together as shown below along the red line, twice; one for the front and one more for the back. Then I attached A to BB (ref pic); As are the side panels. Folding the As half, I attached the last piece of BB.
 Then, I attached the waist piece (C). I kept the joints for CC, aligned with the joints for BB. Finally, I tucked and hemmed all the exposed edges.
 To wear the pants (since the waistline is bigger), I'll have to overlap it in front, and fold down twice, to secure it in place. You can try variations of how to wear them, but this is the method I am very used to and it is really quick.
 Here, I am seen parading in front of the mirror again. I have worn it to the office too!
Monday, September 8, 2008
Roman Ruins : Part 3 - HARANGUS ADNAUSEUM & LICENTIUS CAESAR
Harangus is the epitome of a successful senator. He is a multifaceted man - part politician and part philosopher, but all Roman. As a military tribune, years ago, he stormed the shores of Normandy. . . and conquered the Normans. Harangus owns a considerable amount of land in and around Rome, but he does not crave wealth and property. He holds closely to Stoic philosophy, maintaining complete control over his emotions and eliminating all wants and desires. If given the opportunity, he will expound on the virtues of Stoicism for days on end, as he did in his now-infamous, three-day oration, "It's my party, and I'll be Stoic if I want to."
[extracted from character description in the Guest List]
Costume Suggestion: Toga with a purple border worn over a tunic.
As ruler of the known world, Licentius Caesar walks proudly in the noble tradition of his late father, Disgustus Caesar. When Disgustus died unexpectedly several years ago after eating some tainted shellfish, the youthful but determined Licentius managed to put aside the cloak of grief that weighed heavily on him and took on the mantle of leadership. Since that tumultuous day, Caesar has made great efforts to bring together the military, the temple, the senate, and business interests in new and unique ways. As a devoted friend of poet Flabbius Corpus, Licentius Caesar also demonstrates an undying interest in the arts. He considers the arts an essential complement to the rigors of statecraft and international relations. His current international relation is a particular Queen of the Nile.
[extracted from character description in the Guest List]
Costume Suggestion: Purple cloth draped over a tunic. Laurel leaf crown.
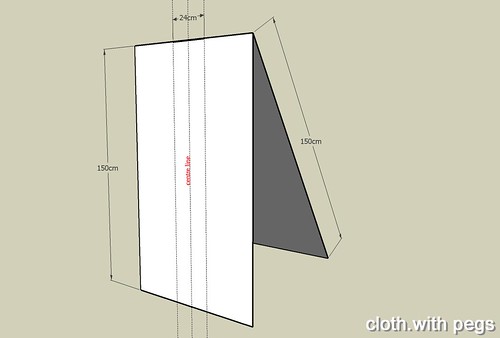
Starting with a cloth of 3m(L) by approx. 90cm(W), I folded it in half, lengthwise. Marking the centreline, I offset it bothsides by about 12cm and marked it.
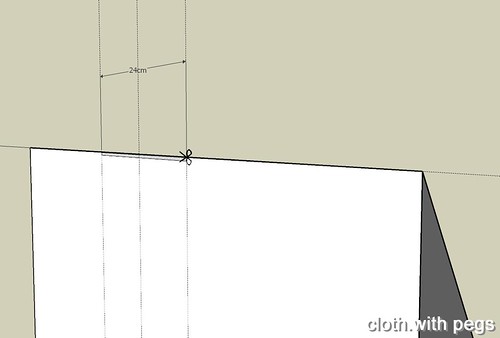
 Cutting it straight across where I marked it previously, I created a 24cm wide opening for the neckline and hemmed the cut edges.
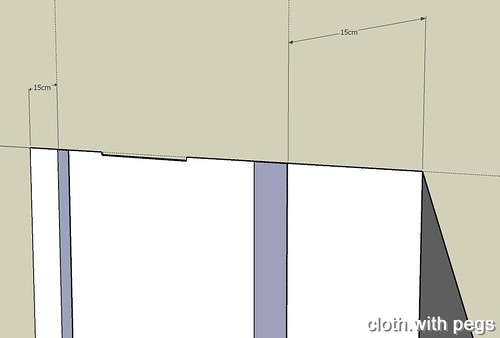
 For the embellishments down both sides on the front of the tunic, I offset 15cm from the side, and sewed on the gaudish gold ribbons.
Finally, I sewed the front to the back, on right and left side of the tunic, while leaving a 25cm opening on the top for the hands.
 Adding a belt will give it waistline and you can garnish the head with the laurel leaf headband for the Roman look. Below, the grey tunic with silver ribbon would be for Harangus.
 And the beige colored tunic with red&gold ribbons would be Caesar. I improvised on the pattern above for the embellishing, by sewing it across under the neckline and one more vertical down the middle. (picture of left would be without the belt, and picture on right is with belt and leather gauntlets/cuffs)
For earlier posts related to my Roman Murder Mystery Costumes Project, please refer to the following links:
Roman Ruins : Prologue
- Introduction my Roman Murder Mystery Costumes Project.
Roman Ruins : Part 1 - MERCEDES ACCELLERATTI
- A rough guide to the construction of a ladies tunic.
[extracted from character description in the Guest List]
Costume Suggestion: Toga with a purple border worn over a tunic.
As ruler of the known world, Licentius Caesar walks proudly in the noble tradition of his late father, Disgustus Caesar. When Disgustus died unexpectedly several years ago after eating some tainted shellfish, the youthful but determined Licentius managed to put aside the cloak of grief that weighed heavily on him and took on the mantle of leadership. Since that tumultuous day, Caesar has made great efforts to bring together the military, the temple, the senate, and business interests in new and unique ways. As a devoted friend of poet Flabbius Corpus, Licentius Caesar also demonstrates an undying interest in the arts. He considers the arts an essential complement to the rigors of statecraft and international relations. His current international relation is a particular Queen of the Nile.
[extracted from character description in the Guest List]
Costume Suggestion: Purple cloth draped over a tunic. Laurel leaf crown.
Starting with a cloth of 3m(L) by approx. 90cm(W), I folded it in half, lengthwise. Marking the centreline, I offset it bothsides by about 12cm and marked it.
 Cutting it straight across where I marked it previously, I created a 24cm wide opening for the neckline and hemmed the cut edges.
 For the embellishments down both sides on the front of the tunic, I offset 15cm from the side, and sewed on the gaudish gold ribbons.
Finally, I sewed the front to the back, on right and left side of the tunic, while leaving a 25cm opening on the top for the hands.
 Adding a belt will give it waistline and you can garnish the head with the laurel leaf headband for the Roman look. Below, the grey tunic with silver ribbon would be for Harangus.
 And the beige colored tunic with red&gold ribbons would be Caesar. I improvised on the pattern above for the embellishing, by sewing it across under the neckline and one more vertical down the middle. (picture of left would be without the belt, and picture on right is with belt and leather gauntlets/cuffs)
For earlier posts related to my Roman Murder Mystery Costumes Project, please refer to the following links:
Roman Ruins : Prologue
- Introduction my Roman Murder Mystery Costumes Project.
Roman Ruins : Part 1 - MERCEDES ACCELLERATTI
- A rough guide to the construction of a ladies tunic.
- Construction of a Roman Centurion's costume
Subscribe to:
Comments (Atom)

